Growing sweet potatoes in soil bags is an innovative gardening method that maximizes yield even in limited spaces. Whether you’re a home gardener or a small-scale farmer, using soil bags allows for better control over soil quality, aeration, and drainage, leading to healthier plants and a bountiful harvest. In this guide, we’ll walk you through everything you need to know—from choosing the right bags to harvesting and curing your
## **Why Grow Sweet Potatoes in Soil Bags?**
Sweet potatoes thrive in loose, well-draining soil, making soil bags an excellent alternative to traditional ground planting. Here’s why many gardeners prefer this method:
– **Better Aeration and Drainage** – Fabric or breathable soil bags promote oxygen flow to the roots, preventing waterlogging and root rot.
– **Space Efficiency** – Perfect for urban gardeners or those with limited land. Soil bags can be placed on patios, balconies, or rooftops.
– **Pest and Disease Control** – Growing in containers reduces exposure to soil-borne diseases and pests.
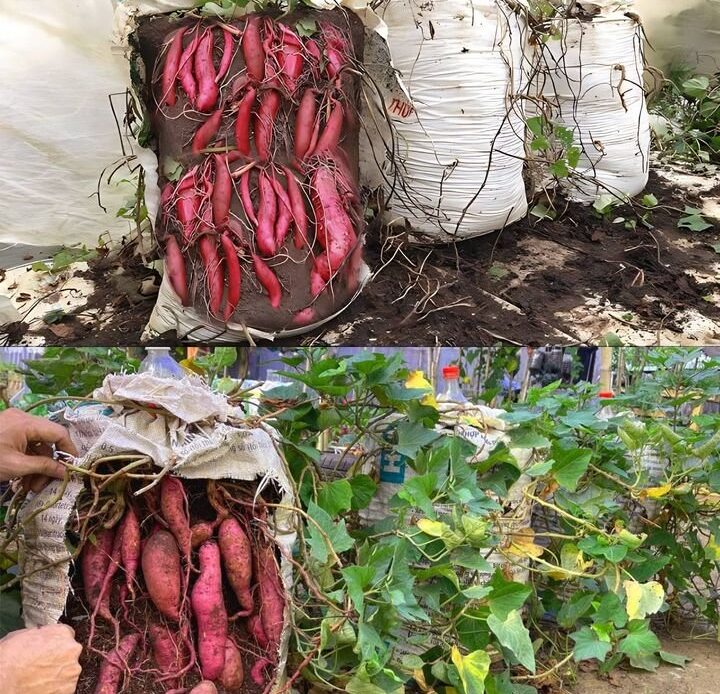
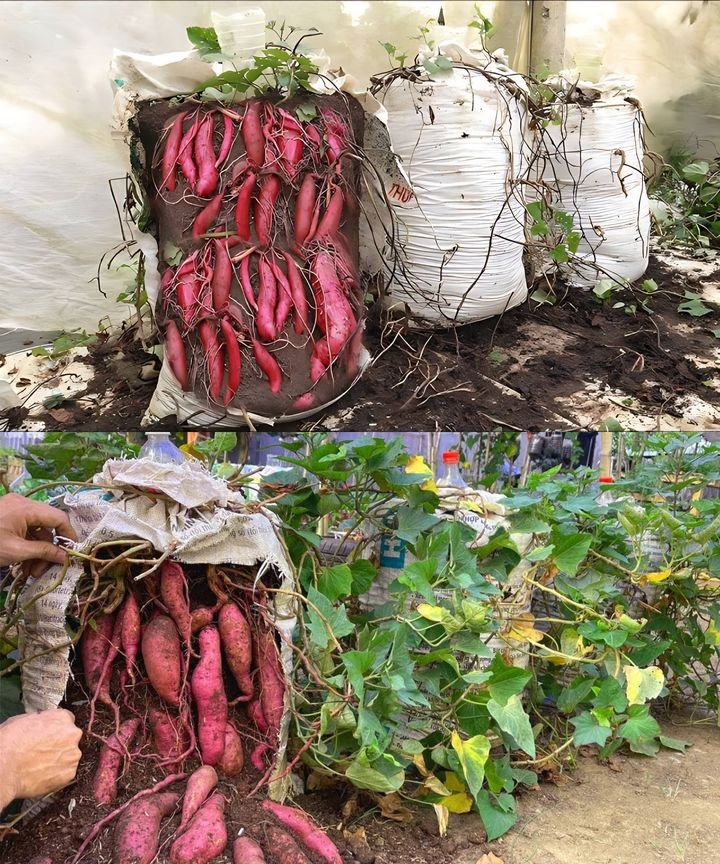
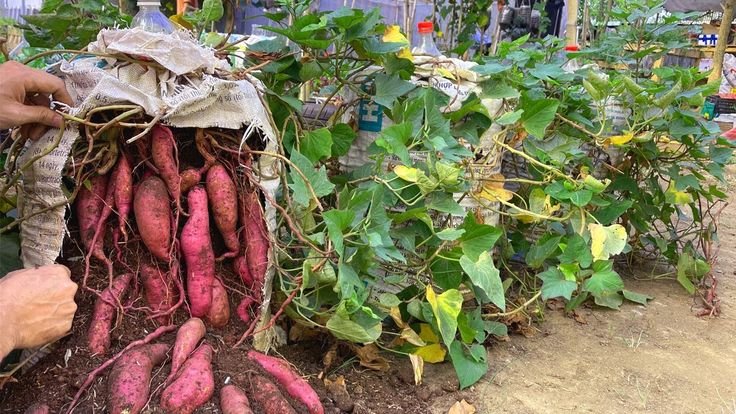
– **Easy Harvesting** – No need for heavy digging. Simply tip the bag over and collect your sweet potatoes.
Now, let’s dive into the step-by-step process to ensure a successful harvest.
## **Step 1: Choose the Right Soil Bags**
Selecting the correct soil bag is crucial for plant health and productivity. Ideally, you should use:
– **15 to 20-gallon fabric or breathable bags** – These allow for superior air circulation, which encourages strong root development.
– **UV-resistant and durable materials** – This ensures the bag lasts multiple growing seasons.
– **Dark-colored bags** – These absorb more heat, promoting better root growth in cooler climates.
Avoid plastic or non-breathable bags, as they can cause excess moisture retention, leading to root diseases.
## **Step 2: Prepare the Ideal Soil Mix**
A well-balanced soil mix is essential for growing sweet potatoes successfully in bags. Sweet potatoes prefer slightly acidic to neutral soil with a pH between 5.5 and 6.5.
### **Recommended Soil Mix:**
– **1 part high-quality potting soil** – Provides essential nutrients and retains moisture.
– **1 part compost** – Adds organic matter, improving soil fertility.
– **1 part coarse sand or perlite** – Enhances drainage and prevents soil compaction.
Before planting, thoroughly mix the ingredients and fill your soil bags, leaving about 4-6 inches of space from the top.
## **Step 3: Start with Healthy Slips**
Sweet potatoes are grown from slips, which are young sprouts that emerge from a mature sweet potato. You can either purchase slips from a nursery or grow your own at home.
### **How to Grow Your Own Slips:**
1. Select a healthy, organic sweet potato.
2. Cut it in half and suspend it in a glass of water using toothpicks, with the bottom half submerged.
3. Place it in a warm, sunny location (70-80°F).
4. After 2-4 weeks, slips will begin to grow.
5. Once the slips are about 6 inches tall, carefully twist them off and place them in water until they develop strong roots.
Healthy slips will give your plants the best start and increase your chances of a successful harvest.
## **Step 4: Plant the Slips Correctly**
Proper planting technique ensures that sweet potatoes establish strong roots and grow efficiently.
### **Planting Process:**
1. **Prepare the soil bags** – Ensure the soil is loose and well-aerated.
2. **Space the slips** – Plant each slip about **12 inches apart** to allow room for tubers to develop.
3. **Bury the slips** – Cover up to the first set of leaves with soil.
4. **Water thoroughly** – After planting, give the slips a deep watering to help them establish.
For best results, plant your slips in early spring or when temperatures consistently stay above 60°F.
## **Step 5: Provide Consistent Watering**
Water management is key to preventing stress and encouraging strong tuber development. Sweet potatoes need **consistent moisture**, but overwatering can lead to rot.
### **Watering Tips:**
– Keep the soil **evenly moist** but **not waterlogged**.
– Water **once or twice a week**, depending on rainfall and temperature.
– Reduce watering as the plants mature to encourage tuber growth.
– Consider **drip irrigation** for consistent moisture without oversaturation.
Proper watering leads to higher yields and better-quality sweet potatoes.
## **Step 6: Ensure Adequate Sunlight**
Sweet potatoes are sun-loving plants that require **at least 6-8 hours of direct sunlight daily**.
### **Sunlight Tips:**
– Place soil bags in a **south-facing** location for maximum exposure.
– Rotate the bags if necessary to ensure **even light distribution**.
– If growing indoors or in a greenhouse, use **grow lights** to supplement natural sunlight.
Without enough sunlight, plants may produce more vines and fewer tubers.
## **Step 7: Fertilize Appropriately**
Using the right fertilizer ensures balanced growth and prevents excessive vine production.
### **Best Fertilizers for Sweet Potatoes:**
– **Balanced, slow-release fertilizer** (e.g., 10-10-10 or 5-10-10).
– **High potassium and phosphorus** for strong root and tuber formation.
– **Avoid high nitrogen fertilizers**, as they encourage excessive foliage growth instead of tubers.
Apply fertilizer at planting time and again halfway through the growing season.
## **Step 8: Control Pests and Diseases**
Although soil bags reduce pest issues, some insects and diseases can still affect sweet potatoes.
### **Common Pests:**
– **Aphids** – Use neem oil or insecticidal soap.
– **Sweet potato weevils** – Rotate crops yearly and inspect plants regularly.
– **Wireworms** – Avoid planting in recently turned sod.
### **Common Diseases:**
– **Fungal diseases (e.g., black rot, leaf spot)** – Improve air circulation and avoid overhead watering.
– **Root rot** – Ensure proper drainage and avoid overwatering.
Regularly inspecting your plants and applying organic pest control methods will help maintain plant health.
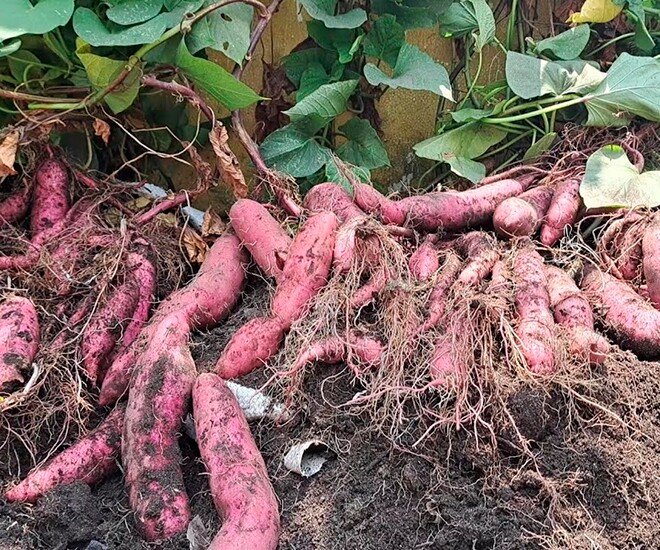
## **Step 9: Harvest at the Right Time**
Sweet potatoes are ready for harvest **90-120 days** after planting, depending on the variety and growing conditions.
### **Signs It’s Time to Harvest:**
– Leaves start to **yellow and die back**.
– Tuber size appears sufficient when checking under the soil.
To harvest, gently remove the soil around the tubers and lift them carefully to avoid damage.
## **Step 10: Cure and Store Sweet Potatoes for Longevity**
Curing is an essential step that improves the sweetness and storage life of sweet potatoes.
### **How to Cure Sweet Potatoes:**
1. Place freshly harvested tubers in a **warm, humid area (80-85°F, 85% humidity)** for **10-14 days**.
2. After curing, store sweet potatoes in a **cool (55-60°F), dark place**.
Properly cured sweet potatoes can last **several months**, making them a long-term food source.
## **Final Thoughts**
Growing sweet potatoes in soil bags is a simple yet effective way to produce a high-yielding crop with minimal space. By following these steps—choosing the right bags, preparing the perfect soil mix, planting healthy slips, and maintaining optimal growing conditions—you’ll enjoy a successful harvest season after season.
Whether you’re gardening in a small backyard or on a city balcony, this method proves that anyone can grow sweet potatoes with ease. Start your soil bag garden today and enjoy fresh, homegrown sweet potatoes all year long