Growing a mango tree from cuttings in water is an exciting and efficient way to propagate this delicious fruit without using seeds. Unlike traditional seed germination, which can take years before bearing fruit, growing mango trees from cuttings can significantly shorten the time to production. This method is simple, requires minimal materials, and is ideal for gardeners who want a fast and effective way to cultivate mango trees. In this guide, we will take you through the step-by-step process of growing a mango tree from cuttings in water, ensuring that your tree thrives and eventually produces fruit.
### **Why Grow Mango Trees from Cuttings?**
Growing mango trees from cuttings offers several benefits:
– **Faster Growth** – Cuttings establish and grow faster than seeds.
– **True to Parent Plant** – The tree will have the same characteristics as the parent tree, including fruit size and flavor.
– **Easier to Maintain** – Cuttings tend to be hardier and more resistant to diseases.
– **Suitable for Small Spaces** – You can control the tree’s growth, making it perfect for container gardening.
### **Materials Needed**
Before you start, gather the following materials to ensure a smooth propagation process:
– A healthy mango tree (from which to take cuttings)
– Sharp, sterilized pruning shears
– A clean glass jar or container
– Fresh, clean water
– Rooting hormone (optional, but recommended for better success)
– A plastic bag or humidity dome (optional for moisture control)
### **Step-by-Step Guide to Growing a Mango Tree from Cuttings in Water**
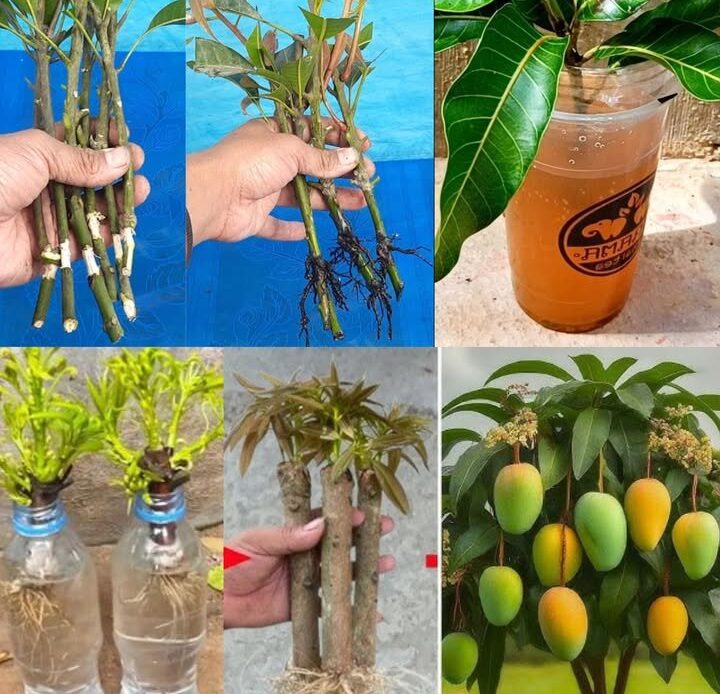
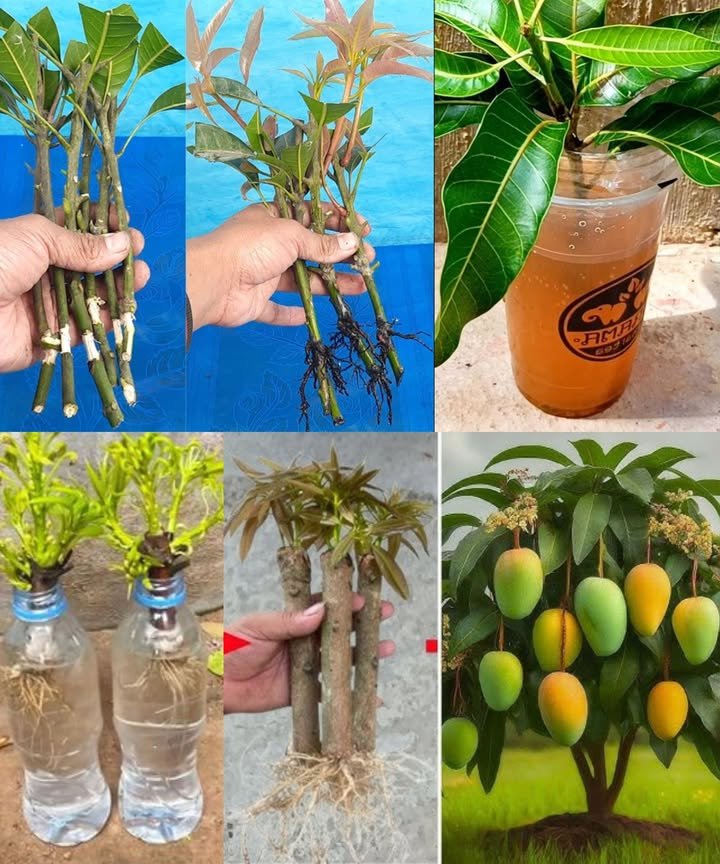
#### **Step 1: Selecting and Preparing the Cutting**
1. **Choose a Healthy Branch**
– Select a semi-hardwood branch from a healthy, mature mango tree.
– Look for a branch that is about 6-8 inches long and has a few healthy leaves.
2. **Make a Clean Cut**
– Using sharp, sterilized pruning shears, cut the branch just below a node (the point where leaves emerge).
– A clean cut helps prevent infections and encourages root growth.
3. **Remove Excess Leaves**
– Strip the lower half of the cutting, leaving only a few leaves at the top.
– This reduces water loss and helps the cutting focus its energy on root development.
4. **Apply Rooting Hormone (Optional, but Recommended)**
– Dip the cut end into a rooting hormone to stimulate faster root formation.
– This step significantly increases the success rate of propagation.
#### **Step 2: Placing the Cutting in Water**
1. **Prepare the Container**
– Fill a clean jar or container with fresh water.
– Ensure the water is deep enough to submerge the bottom half of the cutting.
2. **Insert the Cutting**
– Place the cutting into the water, making sure the leaves stay above the waterline.
– Avoid overcrowding if propagating multiple cuttings.
3. **Provide the Right Environment**
– Place the container in a warm, bright location with indirect sunlight.
– Avoid direct sunlight, as it may cause excessive evaporation and stress the cutting.
#### **Step 3: Encouraging Root Growth**
1. **Monitor for Root Development**
– Check the cutting regularly for signs of root growth.
– Typically, roots will begin to form within 2-4 weeks.
2. **Change the Water Regularly**
– Replace the water every 3-4 days to prevent bacterial growth and keep the cutting healthy.
– Always use clean, room-temperature water.
3. **Use a Humidity Dome (Optional)**
– If your environment is dry, cover the cutting with a plastic bag to maintain moisture.
– Make sure to create small holes for air circulation to prevent mold.
#### **Step 4: Transplanting the Rooted Cutting**
1. **Prepare a Pot with Soil**
– Once the roots are about 1-2 inches long, it is time to transplant the cutting.
– Use a well-draining potting mix enriched with organic compost.
2. **Plant the Cutting**
– Make a small hole in the soil and carefully place the rooted cutting.
– Ensure the roots are fully covered while keeping the stem upright.
3. **Water Gently**
– Water the plant lightly to help settle the soil around the roots.
– Avoid overwatering, as excessive moisture can lead to root rot.
#### **Step 5: Caring for Your Mango Tree**
1. **Sunlight Requirements**
– Place the plant in a warm spot that receives at least 6-8 hours of indirect sunlight daily.
– If grown indoors, use a grow light to supplement natural light.
2. **Watering Needs**
– Keep the soil consistently moist but not soggy.
– Allow the top layer of soil to dry slightly between waterings.
3. **Temperature and Humidity**
– Mango trees thrive in warm temperatures between 70-85°F (21-29°C).
– Maintain moderate humidity levels to prevent drying out.
4. **Fertilizing Schedule**
– Use a balanced, water-soluble fertilizer every 4-6 weeks to promote healthy growth.
– Organic compost or liquid seaweed extract can also be beneficial.
5. **Pruning and Maintenance**
– Regularly trim dead or yellowing leaves to encourage new growth.
– Once the tree establishes, prune to shape and strengthen the structure.
### **Common Problems and Solutions**
– **Cutting Not Rooting:** Ensure you are changing the water regularly and keeping the environment warm. Using rooting hormone can also help.
– **Leaves Wilting:** Keep the humidity levels consistent, and avoid placing the cutting in direct sunlight.
– **Mold or Algae in Water:** If you notice mold or algae growth, clean the container thoroughly and use fresh water.
### **Final Thoughts**
Growing a mango tree from cuttings in water is a simple yet rewarding gardening project. With the right care and patience, you can successfully propagate mango trees and enjoy the satisfaction of nurturing a plant from a small cutting into a thriving tree. This method not only speeds up the growth process but also allows you to grow a mango tree that retains the best characteristics of the parent plant. Whether you are an experienced gardener or a beginner, this easy propagation method is a great way to add a beautiful and fruitful tree to your garden.