
A well-protected garden is the key to **stronger plants, extended growing seasons, and higher yields**. If you’re looking for an effective way to **shield your crops from harsh weather, pests, and temperature fluctuations**, a **hinged hoophouse** is the perfect solution.
This DIY guide will walk you through **the benefits of a hinged hoophouse, step-by-step building instructions, and expert tips** to maximize its efficiency. Whether you’re a beginner or an experienced gardener, this structure will help **transform your garden into a thriving, year-round growing space**.
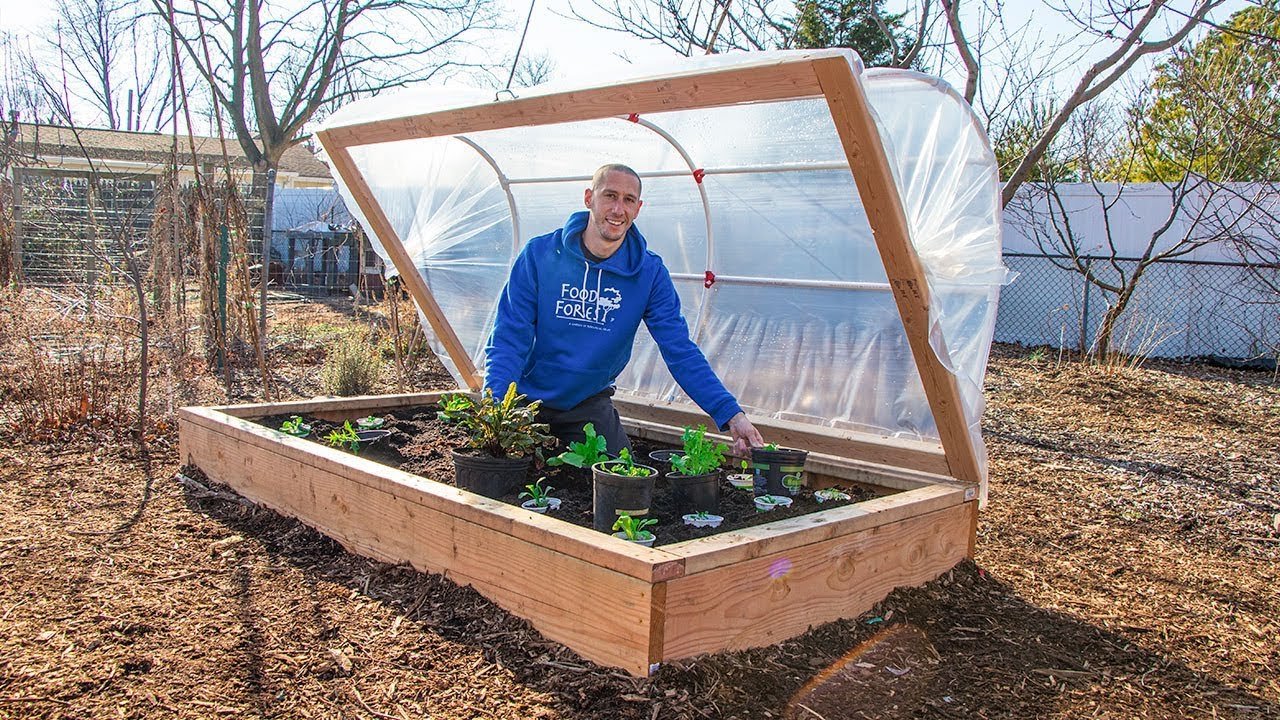
## **🌱 What is a Hinged Hoophouse?**
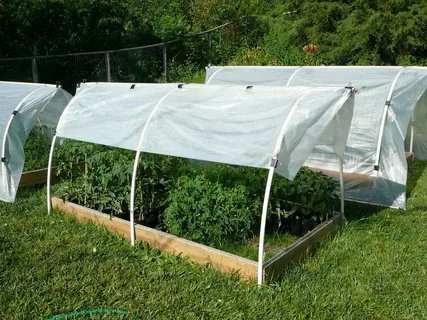
A **hinged hoophouse** is a **mini greenhouse structure with a movable frame**, designed to **protect plants from frost, heavy rain, strong winds, and pests** while allowing easy access for watering, harvesting, and maintenance. Unlike traditional greenhouses, its **hinged design makes it easy to open and close**, providing **convenience and versatility** for gardeners.
**Why choose a hinged hoophouse?**
✔ **Extends the growing season** – Grow vegetables earlier in spring and later into fall.
✔ **Protects plants from extreme weather** – Prevents frost damage, excessive heat, and heavy rainfall.
✔ **Keeps pests at bay** – Acts as a barrier against insects, rodents, and birds.
✔ **Improves plant growth** – Creates a controlled environment for healthier crops.
✔ **Cost-effective alternative to greenhouses** – Requires minimal materials and is easy to build.

## **📋 Materials and Tools You Need**
Before you start building your **hinged hoophouse**, gather the following supplies:
### **Materials:**
✅ **PVC pipes or metal conduit** – Forms the curved hoop frame.
✅ **Wooden boards (2×4 or 2×6)** – Used for the base and hinges.
✅ **Plastic sheeting or greenhouse film** – Provides insulation and protection.
✅ **Hinges and screws** – Essential for the lifting mechanism.
✅ **U-bolts or brackets** – Secures the pipes to the base.
✅ **Zip ties or clamps** – Holds the plastic covering in place.
✅ **Weights or stakes** – Prevents wind damage.
### **Tools:**
🔧 **Drill and screws** – For securing hinges and brackets.
🔧 **Saw** – To cut wood to size.
🔧 **Measuring tape** – Ensures accurate cuts and placement.
🔧 **Staple gun** – To attach plastic sheeting.
## **🛠 Step-by-Step Guide to Building a Hinged Hoophouse**
### **Step 1: Choose the Right Location**
– Select a spot with **maximum sunlight exposure** (at least 6–8 hours per day).
– Ensure **good drainage** to prevent water buildup.
– Position it near your garden beds for **easy access**.
### **Step 2: Build the Wooden Base**
– Measure and cut **four wooden boards** to create a rectangular base.
– Secure the corners with screws to form a sturdy frame.
– Attach **hinges** to one of the long sides—this will be the lifting mechanism.
### **Step 3: Install the Hoop Frame**
– Insert **PVC pipes or metal conduit** into the **base frame** to form the arched hoops.
– Secure the pipes using **U-bolts or brackets** at equal intervals.
– Make sure the hoops are **evenly spaced** for structural stability.
### **Step 4: Attach the Plastic Sheeting**
– Cut the **greenhouse plastic or poly sheeting** to size, leaving extra material for coverage.
– Drape it over the hoop frame and **secure it with clamps, zip ties, or staples**.
– Ensure a **tight but flexible fit** to allow easy movement of the hinged top.
### **Step 5: Add the Hinged Mechanism**
– Secure the **hinged side of the frame** to the wooden base.
– Ensure the **hoophouse lid lifts smoothly** and stays in place when opened.
– Add **handles or rope loops** for easier lifting.
### **Step 6: Anchor the Structure**
– Place **weights, stakes, or sandbags** around the base to **prevent wind damage**.
– If needed, add **side vents** for better airflow during warm seasons.
## **How to Use Your Hinged Hoophouse Effectively**
Once your hoophouse is built, follow these tips to **maximize its benefits**:
✅ **Adjust for temperature changes** – Open the hoophouse on warm days for ventilation and close it during cold nights.
✅ **Monitor humidity levels** – Proper airflow prevents fungal diseases.
✅ **Rotate crops** – Helps maintain soil health and prevents nutrient depletion.
✅ **Use it year-round** – Start seedlings in early spring, extend fall harvests, and protect delicate plants in winter.
✅ **Secure the plastic covering** – Regularly check for tears or loose edges to maintain insulation.
## **Best Crops to Grow Under a Hinged Hoophouse**
A hoophouse is perfect for growing **cool-season and delicate crops**, including:
🥦 **Leafy Greens** – Lettuce, spinach, kale, arugula
🥕 **Root Vegetables** – Carrots, radishes, beets, turnips
🥬 **Brassicas** – Broccoli, cauliflower, cabbage
🌿 **Herbs** – Cilantro, parsley, chives, basil
🌶️ **Tender Plants** – Peppers, tomatoes, cucumbers (early-season growth)
During winter, a **hinged hoophouse helps protect overwintering crops like garlic, onions, and hardy greens**.
## **Common Mistakes to Avoid**
🚫 **Overwatering** – Hoophouses trap moisture, so adjust watering frequency to avoid fungal growth.
🚫 **Forgetting to ventilate** – Lack of airflow leads to overheating and plant stress.
🚫 **Weak anchoring** – Secure the structure properly to prevent wind damage.
🚫 **Using poor-quality plastic** – Invest in **UV-resistant greenhouse film** for durability.
## **Final Thoughts: Build a Hinged Hoophouse for a Thriving Garden**
A **hinged hoophouse is a game-changer for any gardener** looking to **extend the growing season, protect plants, and boost harvests**. With a **simple DIY setup**, you can create a cost-effective, efficient garden structure that allows for **better crop management and increased yields**.
Start building your hoophouse today and enjoy the **benefits of a protected, thriving garden all year round**