
If you’re interested in hatching your own eggs but don’t have access to an expensive incubator, building a homemade egg incubator using a water bottle is a fun and cost-effective solution. With just a few simple materials and some basic DIY skills, you can create an incubator that will help you successfully hatch eggs at home. In this guide, we’ll show you step-by-step how to build your own homemade egg incubator using a plastic water bottle.
### **Why Use a Water Bottle for an Egg Incubator?**
Using a plastic water bottle for a homemade egg incubator may seem unconventional, but it’s an effective method that offers a simple and affordable solution for beginners. The water bottle serves as a small, enclosed space to maintain the right temperature and humidity, crucial factors for egg incubation. The shape and material of the bottle also allow for easy adjustments and a DIY approach to incubation.
By building your own egg incubator, you gain control over the incubation process, allowing you to hatch eggs from birds such as chickens, ducks, or quails, right in your home. So, let’s get started with this easy-to-follow guide
### **Materials Needed:**
Before you start building your homemade incubator, gather the following materials:
– A clean plastic water bottle (2 liters or larger)
– A small fan (USB-powered works well)
– A thermometer and hygrometer (to measure temperature and humidity)
– A small lamp or light bulb (preferably 15-watt to 25-watt)
– Scissors or a sharp knife
– A cardboard or foam base
– A piece of fabric or sponge for humidity
– A small bowl or container for water
– Tape or glue for securing pieces
### **Step-by-Step Guide: How to Build the Incubator**
#### **1. Prepare the Water Bottle**
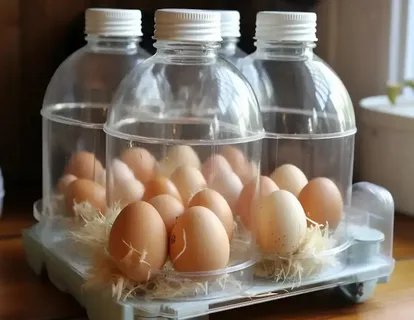
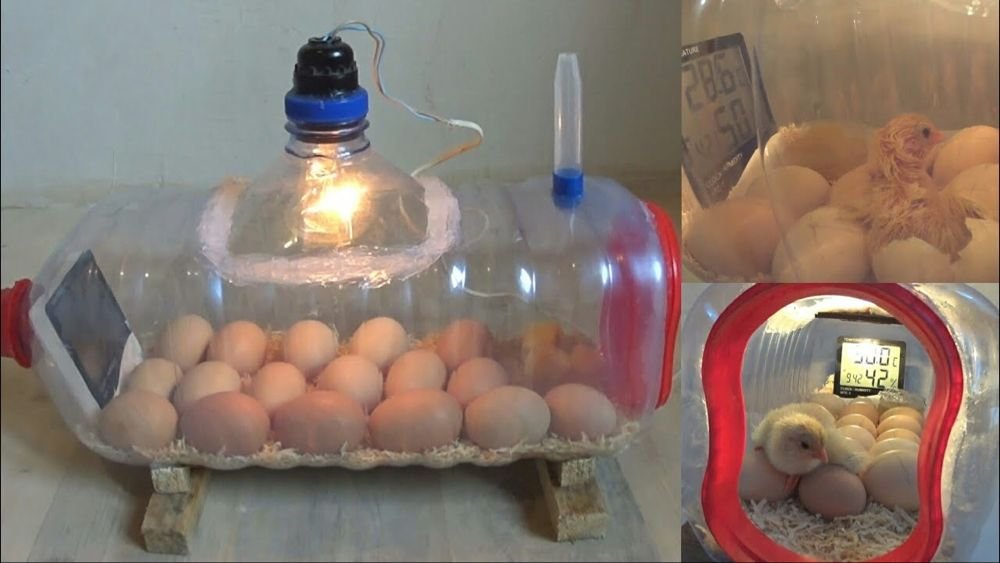
Start by thoroughly cleaning the plastic water bottle to ensure there is no residue or chemicals inside. A 2-liter bottle works well for small batches of eggs. Cut the bottle carefully, creating a large opening to allow easy access to the inside of the incubator. Leave the bottom part of the bottle intact to serve as the base for your eggs. You can cut the top portion of the bottle, or leave it open to create a larger space for airflow.
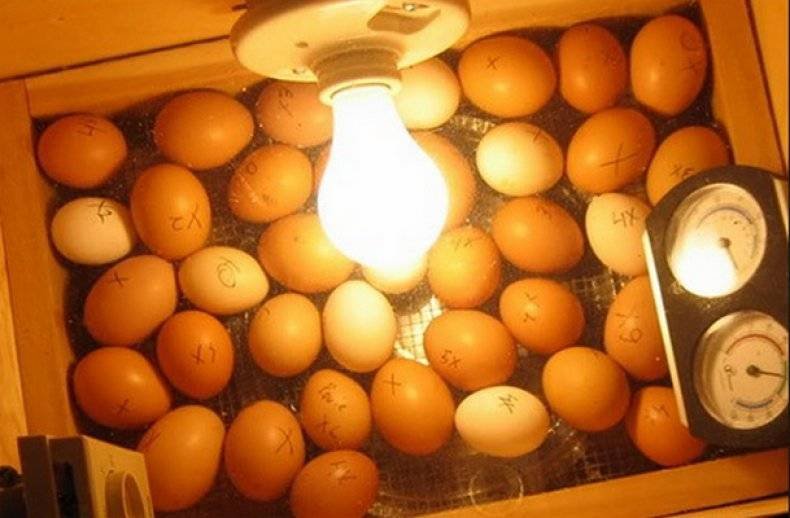
#### **2. Install the Light Source**
To create the proper warmth for your eggs, you need a light source. A small lamp or light bulb works best for this purpose, as it provides consistent heat. Depending on the size of your water bottle, choose a light bulb that won’t overheat the space—typically, a 15-watt to 25-watt bulb is sufficient.
– Drill a hole in the cap or the side of the bottle where the light bulb can be inserted.
– Attach the light bulb securely inside the bottle, making sure it doesn’t touch the plastic directly. This will prevent the plastic from melting.
– Use tape or glue to ensure the light source is firmly in place.
#### **3. Add a Fan for Air Circulation**
Good airflow is essential for successful egg incubation. To simulate the natural process of a mother bird turning her eggs, you need a fan to circulate the air inside the incubator.
– Position a small USB-powered fan inside the water bottle to ensure consistent airflow.
– Attach the fan to the top of the water bottle, making sure it blows air evenly inside without interfering with the eggs.
– If you don’t have a fan, you can create small ventilation holes in the water bottle to allow airflow.
#### **4. Add a Humidity Source**
Maintaining proper humidity is crucial for hatching eggs. You can regulate the humidity in your homemade incubator using a small bowl of water or a sponge.
– Place a small container or bowl filled with water inside the incubator to raise the humidity levels.
– If you’d like to maintain a more consistent humidity level, consider adding a damp sponge to the incubator. The sponge will help release moisture into the air slowly, mimicking the natural humidity levels required for egg hatching.
#### **5. Set Up a Temperature Monitoring System**
A thermometer and hygrometer are essential tools for ensuring the correct conditions inside your homemade incubator. The ideal temperature for egg incubation is between **99°F and 102°F (37.2°C – 38.9°C)**, depending on the type of egg you’re hatching. Humidity should be maintained at around **50-60%** during most of the incubation period, increasing slightly during the final stages of hatching.
– Install the thermometer and hygrometer inside the water bottle, making sure it’s visible and easy to read.
– Place the thermometer close to the eggs, as this will give you an accurate reading of the temperature that the eggs are exposed to.
#### **6. Place the Eggs Inside**
Now that your incubator is ready, it’s time to add the eggs. Arrange your eggs carefully inside the water bottle incubator, ensuring they have enough space for air circulation and warmth.
– You can place the eggs directly on the base of the bottle or on a piece of foam or cardboard for added insulation.
– Be sure to turn the eggs at least three times a day to ensure even heat distribution. You can manually turn the eggs, or create a rotating system using a gentle mechanism or a small motor.
#### **7. Monitor and Adjust**
The key to success when hatching eggs is consistency. Be sure to monitor the temperature and humidity regularly to ensure that the conditions inside the incubator are optimal for egg hatching. Make adjustments as necessary:
– Adjust the light bulb or fan to regulate the temperature.
– Add water to the humidity container as needed.
– Keep track of the number of times you turn the eggs to ensure proper development.
### **Tips for a Successful Egg Incubation**
– **Test the incubator:** Before placing your eggs inside, test the temperature and humidity for a full 24 hours. This ensures that the incubator is working properly.
– **Keep the incubator in a stable environment:** Place the incubator in a room with a consistent temperature to avoid fluctuations that could affect the hatching process.
– **Stay patient:** Hatching eggs takes time—generally, it can take anywhere from 21 days (for chickens) to 28 days (for ducks) for the eggs to hatch. Be sure to maintain the conditions consistently throughout the entire incubation period.
### **Hatch Your Eggs the DIY Way**
Building your own egg incubator using a plastic water bottle is a creative and budget-friendly way to hatch eggs at home. By following these simple steps and ensuring proper temperature, humidity, and airflow, you can create a thriving environment for your eggs to hatch successfully. Not only will you feel the excitement of watching your eggs hatch, but you’ll also gain a greater appreciation for the process of nurturing life.
So why wait? Gather your materials, follow the guide, and start your very own egg incubation project today 🐣🐤🐥