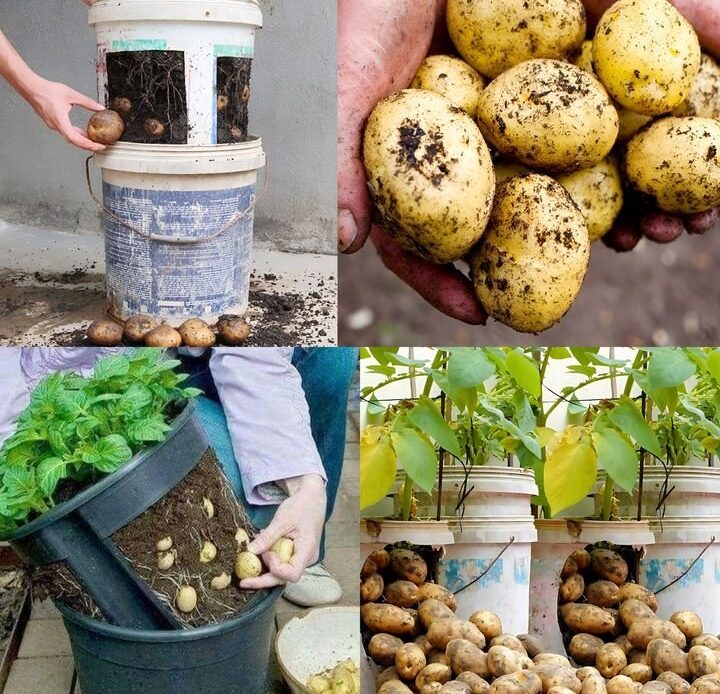
Growing potatoes at home is a rewarding experience, and you don’t need a large garden to do it. If you have old paint buckets lying around, you can repurpose them into a productive potato-growing system. This method is perfect for urban gardeners, those with limited space, or anyone looking for a fun DIY project.
In this detailed guide, we will walk you through the step-by-step process of growing potatoes in old paint buckets. From preparation to harvesting, you’ll learn how to maximize your yield with minimal effort.
## 🌿 Why Grow Potatoes in Buckets?

Before diving into the step-by-step process, let’s explore why growing potatoes in buckets is a great idea:
✅ **Space-Saving** – Ideal for balconies, patios, or small gardens.
✅ **Pest Control** – Reduces the risk of soil-borne diseases and pests.
✅ **Better Drainage** – With proper holes, you can control water levels effectively.
✅ **Easier Harvesting** – No digging required—just dump the bucket and collect your potatoes
Now, let’s get started with the process.
## 🪣 Step 1: Preparing the Buckets
Old paint buckets make excellent potato planters, but proper preparation is essential.
### 🔧 Cleaning the Buckets
Before using them, clean the buckets thoroughly to remove any paint residue or chemicals. Wash them with soap and water, then rinse well. If the buckets previously held toxic materials, avoid using them for growing food.
### 🔩 Drilling Drainage Holes
Proper drainage is crucial to prevent waterlogging and root rot. Use a drill to create multiple holes at the bottom and lower sides of the bucket. This ensures excess water drains out while keeping the soil moist but not soggy.
💡 _Pro Tip:_ Place a few small stones or gravel at the bottom of the bucket to improve drainage.
## 🥔 Step 2: Preparing the Seed Potatoes
Not all potatoes are suitable for planting. To get the best results, choose **certified seed potatoes** rather than store-bought ones, which may be treated with chemicals to prevent sprouting.
### 🌱 Chitting the Potatoes
Chitting is the process of pre-sprouting potatoes before planting. This helps them grow faster and produce higher yields.
– Place the seed potatoes in a cool, bright area (like a windowsill) for 2-3 weeks.
– Allow small sprouts (about ½ inch long) to develop before planting.
### 🔪 Cutting the Potatoes
If you have large seed potatoes, cut them into smaller pieces. Each piece should have at least one “eye” (sprout).
– Let the cut pieces dry for 24 hours before planting. This prevents rotting.
💡 _Pro Tip:_ If you’re planting whole small potatoes, there’s no need to cut them.
## 🌿 Step 3: Planting the Potatoes
Now that your buckets and potatoes are ready, it’s time to plant
### 🏺 Adding Soil
– Fill the bucket with **4-6 inches** of high-quality, well-draining potting soil or a mix of compost and garden soil.
– Avoid using heavy clay soil, as it retains too much moisture.
### 🌱 Planting the Potatoes
– Place **2-3 seed potatoes** in the bucket with the sprouts facing up.
– Cover them with another **4-6 inches** of soil.
💡 _Pro Tip:_ Do not fill the bucket to the top yet—potatoes need space to grow
## 💧 Step 4: Watering and Caring for Your Potatoes
Potatoes need consistent moisture but should never be waterlogged.
### 🚿 Watering
– Water the soil thoroughly after planting.
– Keep the soil **evenly moist** but not soggy.
– Reduce watering slightly when the plants start flowering.
### 🌞 Light Requirements
Place your bucket in a **sunny location** where the potatoes receive at least **6-8 hours of direct sunlight daily**.
### 🏗 Hilling (Adding More Soil)
As your potato plants grow, they will produce new tubers along the buried stems. To maximize your yield:
1. Once the plants grow **6-8 inches tall**, add more soil to cover the lower stems, leaving the top leaves exposed.
2. Repeat this process until the bucket is nearly full.
💡 _Pro Tip:_ Hilling prevents sunlight from reaching developing potatoes, which can turn them green and toxic.
## 🍂 Step 5: Optional – Adding Mulch
For extra moisture retention and weed prevention, you can add mulch such as **straw, shredded leaves, or wood chips** on top of the soil.
### 🌾 Benefits of Mulching
✅ Keeps soil cool and moist
✅ Reduces the need for frequent watering
✅ Prevents weeds from competing with your potatoes
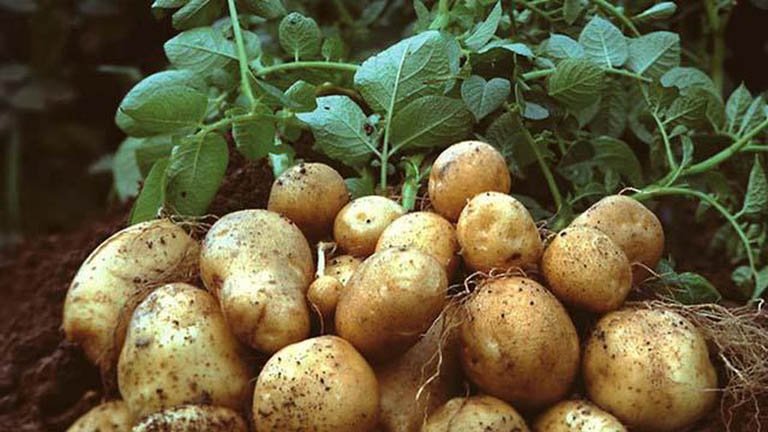
## 🥔 Step 6: Harvesting Your Potatoes
After weeks of careful watering and care, it’s time to harvest your homegrown potatoes
### ⏳ When to Harvest
– **For baby potatoes:** Harvest **2-3 weeks after flowering** begins. Gently dig around the edges to collect small, tender potatoes.
– **For mature potatoes:** Wait until the **foliage turns yellow and dies back** (usually 10-12 weeks after planting).
### 🏺 How to Harvest
– If you’re growing in buckets, harvesting is simple Just **tip the bucket over** and sift through the soil to collect your potatoes.
– Brush off excess dirt and allow them to dry for a few hours before storing.
💡 _Pro Tip:_ Store harvested potatoes in a **cool, dark place** to keep them fresh longer.
## 🌟 Expert Tips for Success
To ensure a healthy and productive potato harvest, keep these expert tips in mind:
### ✅ Choose the Right Variety
Select **early or mid-season potato varieties** for the best results in containers. Some great options include:
– Yukon Gold
– Red Norland
– Fingerling Potatoes
### ✅ Watch for Pests
Potatoes can attract pests like aphids and potato beetles. Inspect your plants regularly and remove any unwanted bugs by hand or use organic insecticidal soap.
### ✅ Fertilize Wisely
Use a **balanced, slow-release fertilizer** or compost tea every few weeks to provide essential nutrients. Avoid too much nitrogen, as it encourages leafy growth rather than tuber development.
## 🏆 Final Thoughts
Growing potatoes in old paint buckets is a fantastic way to enjoy fresh, homegrown produce with minimal effort. Whether you have limited space or just want a fun gardening project, this method is highly effective.
With proper preparation, care, and patience, you’ll be rewarded with a delicious potato harvest right from your own home So, why not grab a few buckets and start planting today?
**Happy gardening 🥔🌱**