There’s nothing quite like the taste of a juicy, sun-ripened peach straight from your own tree. While many people think growing a peach tree requires buying expensive saplings, the truth is **you can grow a peach tree from seed right at home—easily and affordably**.
With a little patience and the right technique, you can transform a peach pit into a thriving tree that will provide delicious fruit for years to come. In this step-by-step guide, we’ll walk you through the **fastest and easiest way to grow a peach tree from seed at home**.
## **Why Grow a Peach Tree from Seed?**
Growing a peach tree from seed has several benefits, making it an excellent choice for home gardeners:
✔ **Cost-Effective** – No need to buy expensive nursery trees.
✔ **Fun & Educational** – Great for both adults and kids to learn about plant growth.
✔ **Homegrown Goodness** – Enjoy organic, pesticide-free peaches from your own tree.
✔ **Strong & Adaptable Trees** – Trees grown from seed can develop better resistance to local conditions.
Now, let’s get started
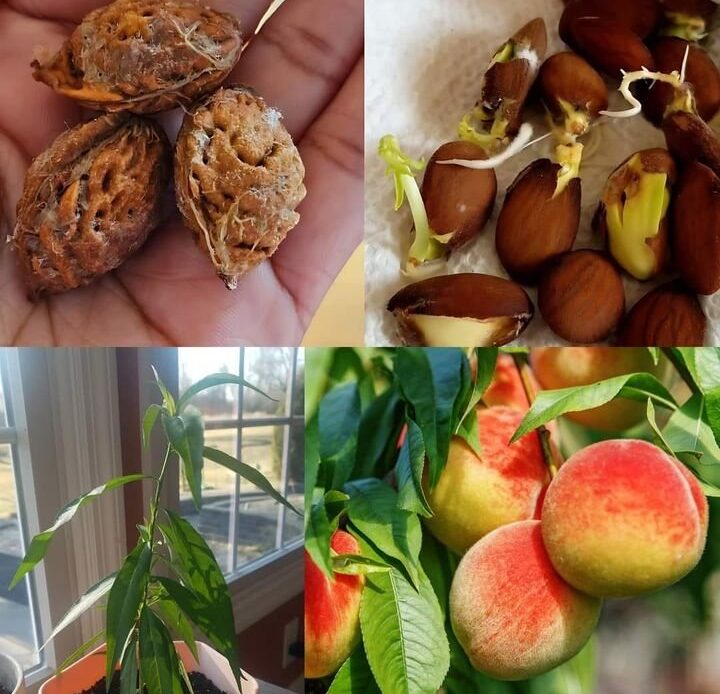
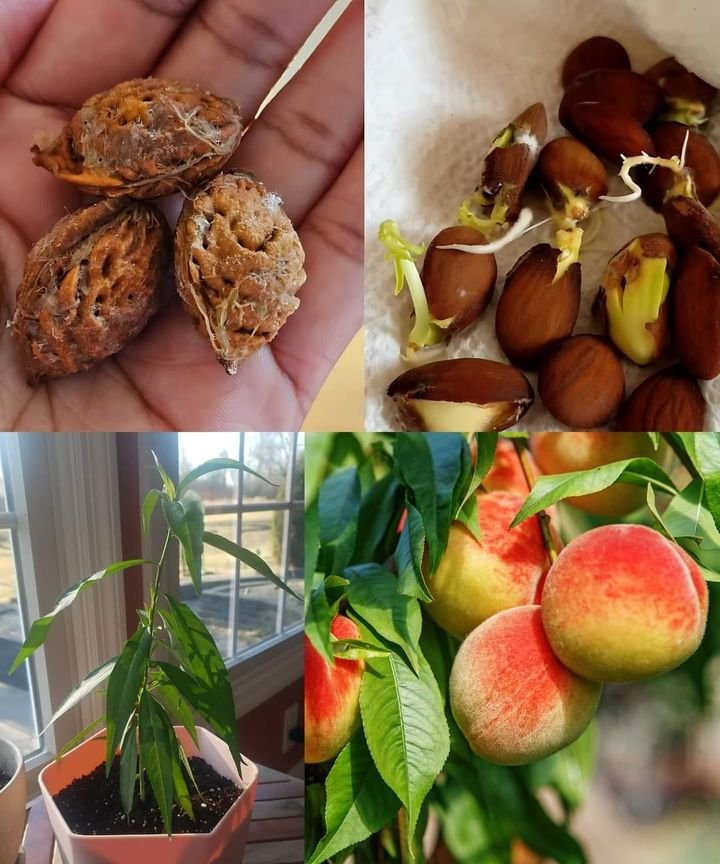
## **Step 1: Extracting and Preparing the Seeds**
The first step in growing a peach tree is selecting the right seed.
### **1. Choose a Ripe Peach**
– Pick a **fully ripe peach** from a tree or buy an organic peach from a farmer’s market.
– Avoid store-bought peaches that may have been treated with chemicals that prevent germination.
### **2. Extract the Pit**
– Cut open the peach and remove the **hard pit** inside.
– Wash off any remaining fruit flesh.
### **3. Dry the Seed**
– Let the pit dry on a paper towel for **about a week** in a cool, dry place.
– This helps prevent mold and makes it easier to crack open.
### **4. Crack the Pit (Optional for Faster Germination)**
– Using a nutcracker or a hammer, carefully crack open the **outer shell** of the pit to reveal the seed inside.
– Be gentle to avoid damaging the actual seed.
– While this step speeds up germination, it is optional—you can also plant the whole pit.
## **Step 2: Pre-Germinating the Seed (Cold Stratification Method)**

Peach seeds require a period of **cold dormancy** before they can sprout. This process, called **stratification**, mimics winter conditions.
### **1. Soak the Seed**
– Place the seed in **a glass of water** and let it soak for **24 hours**.
– Discard any seeds that float, as they may not be viable.
### **2. Wrap the Seed**
– Take a **damp paper towel**, wrap the seed in it, and place it inside a **plastic bag or aluminum foil**.
### **3. Refrigerate for Stratification**
– Store the wrapped seed in the **refrigerator (not freezer)** for **5-6 weeks**.
– Keep the paper towel damp, checking it every week.
– After a few weeks, the seed should start sprouting roots
## **Step 3: Planting the Germinated Seed**
Once the seed has sprouted, it’s time to plant it
### **1. Choose the Right Soil**
– Use **well-draining soil** with a mix of potting soil, compost, and perlite.
– A **pH of 6.0-7.0** is ideal for peach trees.
### **2. Select a Planting Pot**
– Use a **small pot with drainage holes**.
– If planting multiple seeds, space them **at least 3 inches apart**.
### **3. Plant the Seed**
– Make a **small hole** about **1-2 inches deep** in the soil.
– Place the seed inside with the root pointing downward.
– Cover lightly with soil—don’t press it down too hard.
### **4. Provide the Right Growing Conditions**
– Place the pot in **a bright, warm spot** with **indirect sunlight**.
– Keep the **soil moist but not soggy**.
– Ideal temperature: **65-75°F (18-24°C)**.
## **Step 4: Caring for Your Peach Seedling**
Once the seedling starts growing, it needs proper care to develop into a healthy tree.
### **1. Watering**
– Keep the soil **consistently moist** but avoid overwatering.
– Water when the top inch of soil feels dry.
### **2. Sunlight**
– Peach trees love **full sun**—at least **6-8 hours per day**.
– If growing indoors, place near a **south-facing window** or use grow lights.
### **3. Thinning the Seedlings**
– If multiple seeds sprout, **keep the strongest** and remove weaker ones.
### **4. Fertilizing**
– Use a **balanced liquid fertilizer** every **2-3 weeks** during the growing season.
– Organic options like **compost tea or fish emulsion** work well.
## **Step 5: Transplanting the Seedling Outdoors**

Once your peach tree reaches **10-12 inches (25-30 cm) in height**, it’s time to transplant it.
### **1. Choose the Right Location**
– Select a **sunny spot** with **well-draining soil**.
– Avoid planting near large trees or structures that may block sunlight.
### **2. Transplant Carefully**
– Dig a hole **twice as wide and just as deep** as the root system.
– Place the seedling in the hole, spreading the roots gently.
– Fill with soil and **water deeply**.
### **3. Protect the Young Tree**
– Use **mulch around the base** to retain moisture and regulate temperature.
– Consider using **a small fence** or netting to protect from animals.
## **Step 6: Maintaining and Growing a Healthy Peach Tree**
### **1. Watering & Mulching**
– Water deeply **once or twice a week**, depending on climate.
– Add **a layer of mulch** to keep moisture in and weeds out.
### **2. Pruning**
– After the first year, **prune weak or crossing branches** to shape the tree.
– In later years, prune yearly to encourage better fruit production.
### **3. Pest and Disease Control**
– Watch for **aphids, borers, and fungal diseases**.
– Use **organic sprays** or neem oil to control pests naturally.
### **4. When to Expect Fruit**
– Peach trees grown from seed **may take 3-4 years to produce fruit**.
– Be patient—it’s worth the wait
## **Final Thoughts**

Growing a peach tree from seed is a **fun, rewarding, and cost-effective** way to enjoy homegrown peaches. With proper care and patience, you’ll soon have a thriving tree producing **sweet, delicious fruit**.
Why not start today? Pick up a fresh peach, save the seed, and begin your journey to growing **your very own peach tree at home** 🍑🌱🏡