In today’s world, conserving water is essential, especially when it comes to maintaining your garden. A rain barrel is an excellent way to collect and store rainwater, providing a sustainable and eco-friendly solution to watering your plants. By capturing rainwater from your roof and funneling it into a barrel, you can reduce your water bill, conserve natural resources, and ensure your plants receive fresh, chemical-free water. In this article, we’ll guide you step-by-step on how to build your own rain barrel.
### **Why Use a Rain Barrel?**
Rain barrels are not only cost-effective but also environmentally friendly. Here’s why you should consider setting one up in your garden:
#### **1. Water Conservation**
Using rainwater for irrigation reduces the demand on municipal water systems. During dry periods, collecting rainwater helps keep your garden healthy while conserving precious groundwater.
#### **2. Cost-Effective**
Watering your garden with municipal water can be expensive, especially during the summer months. By using rainwater, you can cut down on your water bill.
#### **3. Chemical-Free Watering**
Rainwater is naturally soft, meaning it doesn’t contain the chemicals found in tap water, such as chlorine or fluoride, making it better for your plants.
#### **4. Reduces Runoff and Erosion**
Collecting rainwater prevents runoff, which can cause soil erosion and water pollution in nearby waterways.
### **Materials You’ll Need**
Before you begin building your rain barrel, gather the following materials:
– **55-gallon plastic barrel** (or larger, depending on your needs)
– **Downspout adapter** (to connect the rain barrel to your downspout)
– **Female hose connector** and **¾-inch hose bib**
– **Fiberglass window screen** (to prevent debris from entering the barrel)
– **Silicone sealant** (for sealing any gaps)
– **Drill with different-sized bits** (to create holes for the hose and adapters)
– **1-inch fender washer** and **4-inch hose clamp** (for securing the hose bib)
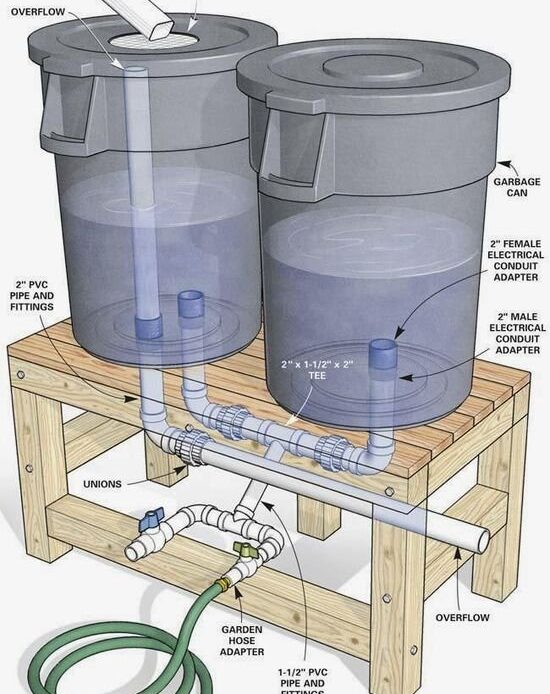
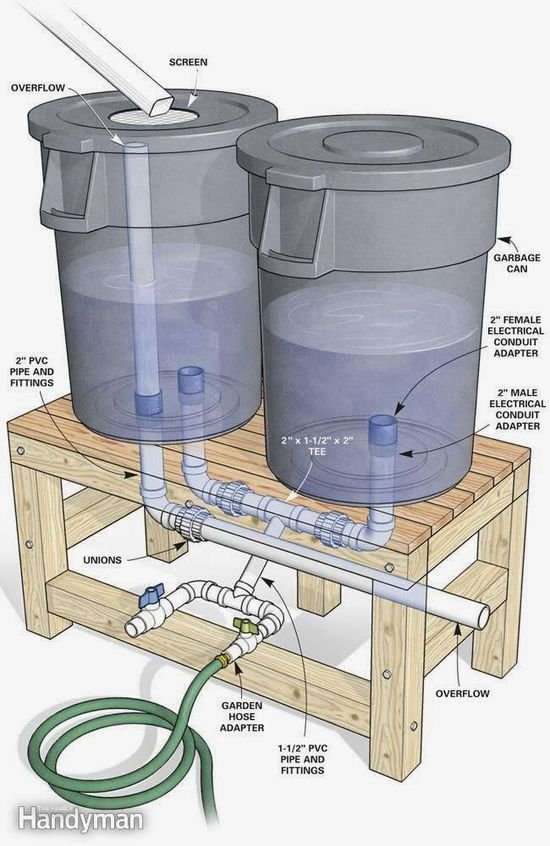
– **PVC piping and fittings** (to connect the downspout to the barrel)
### **Step-by-Step Guide: Building Your Own Rain Barrel**
#### **Step 1: Prepare the Barrel**
Choose a clean 55-gallon plastic barrel, which is an ideal size for collecting rainwater. You can often find these barrels from local suppliers or online. Make sure it is food-safe if you intend to use it for edible plants.
#### **Step 2: Install the Downspout Adapter**
Using a drill, cut a hole in the top of the barrel to fit your downspout adapter. This adapter will connect the downspout from your roof to the barrel, allowing rainwater to flow into it. Secure the adapter with a silicone sealant to ensure there are no leaks.
– **Tip**: Trace the base of the downspout adapter on the lid before cutting to ensure a snug fit.
#### **Step 3: Drill a Hole for the Hose Bib**
Next, drill a 1-inch hole at the bottom of the barrel. This is where you’ll attach the hose bib to draw water from the barrel. Insert the hose bib through the hole, and secure it with a 1-inch fender washer. Use silicone sealant around the edges to prevent leaks.
#### **Step 4: Attach the Female Hose Connector**
On the side of the barrel, drill a hole that fits the female hose connector. This connector will allow you to attach a hose to water your plants. Insert the connector into the hole, securing it with silicone sealant.
#### **Step 5: Install the Overflow Hose**
If the rain barrel becomes too full, it’s important to have a way for the water to overflow. Drill a hole near the top of the barrel and attach a hose for overflow. Ensure the hose is directed away from the foundation of your house to avoid flooding.
#### **Step 6: Cover the Barrel with a Screen**
Place a piece of fiberglass window screen over the top of the barrel to keep debris, such as leaves and insects, out of the water. Secure the screen in place with a hose clamp or by using the barrel’s lid if it fits.
#### **Step 7: Connect the Downspout to the Barrel**
Using PVC piping and a downspout adapter, connect the downspout from your roof to the top of the barrel. You may need to cut the downspout to the correct length using a hacksaw.
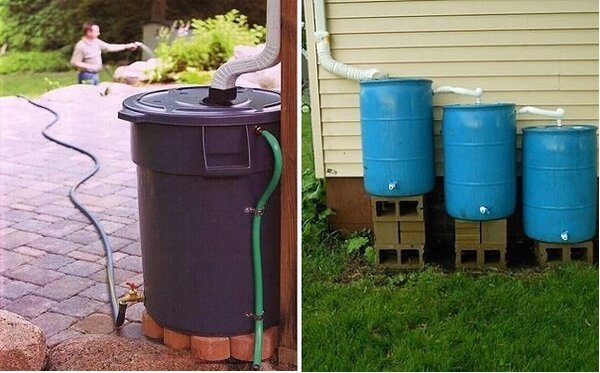
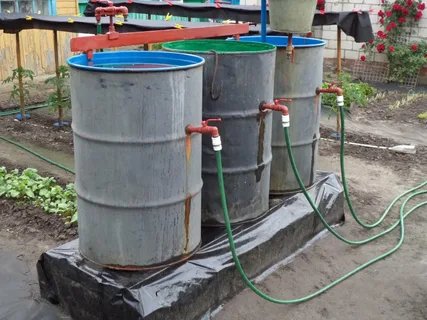
### **Step 8: Set Up Your Rain Barrel**
Position your rain barrel near the downspout, placing it on a level surface. To increase water pressure, elevate the barrel slightly using bricks or a wooden platform. This setup allows gravity to help with water flow when you use the hose.
### **Additional Tips for Maintaining Your Rain Barrel**
– **Clean the Barrel Regularly**: Empty and clean the barrel every few months to prevent algae buildup or debris accumulation.
– **Winter Care**: If you live in a cold climate, make sure to drain your rain barrel before winter to prevent freezing and cracking.
– **Use a Cover**: Consider using a lid or cover for your barrel to prevent insects and debris from getting into the water, especially during hot months.
### **The Benefits of Building a Rain Barrel**
Building your own rain barrel is a rewarding and simple DIY project that can provide lasting benefits for your garden. Not only will you conserve water and reduce your water bills, but you’ll also contribute to a more sustainable and eco-friendly way of maintaining your plants. With just a few materials and steps, you can start collecting rainwater and use it to nourish your garden for years to come.
Start building your rain barrel today, and watch your plants flourish with the power of nature’s water