If you’re looking for a natural, healthy alternative to store-bought vegetable broths filled with preservatives and artificial flavorings, making your own homemade vegetable broth is the perfect solution. Not only is it a simple, cost-effective way to ensure that your meals are nutritious and full of flavor, but it’s also incredibly easy to prepare and store.

In this guide, we’ll show you how to make homemade vegetable broth from scratch, without any chemicals or artificial additives. Plus, we’ll teach you a clever trick to **freeze your broth into ice cubes**, so it’s easy to use in your daily cooking. Ready to transform your kitchen into a haven of healthy, homemade goodness? Let’s dive in
### **Why Make Your Own Vegetable Broth?**
Before we get into the recipe, let’s talk about why you should consider making vegetable broth at home:

– **No Chemicals or Additives**: Many store-bought broths contain artificial preservatives, MSG, and flavor enhancers. When you make your own broth, you control exactly what goes into it.
– **Customizable Flavor**: You can adjust the seasonings and vegetables to suit your personal preferences.
– **Nutritious**: Homemade vegetable broth retains the nutrients from the vegetables, providing a healthy base for soups, stews, and sauces.
– **Saves Money**: Buying pre-made broth can add up over time, but making your own is incredibly affordable. Plus, you can use scraps from your vegetables
### **Ingredients for Homemade Vegetable Broth**

To make a basic homemade vegetable broth, you will need the following:
– **1 large onion** (peeled and roughly chopped)
– **2 medium carrots** (peeled and chopped)
– **2 celery stalks** (chopped)
– **1-2 garlic cloves** (smashed)
– **1-2 bay leaves**
– **A handful of fresh herbs** (parsley, thyme, rosemary, etc.)
– **1 teaspoon of black peppercorns**
– **Salt to taste**
– **8 cups of filtered water**
– **Optional: Vegetable scraps** (such as potato peels, corn cobs, and mushroom stems)
### **Step-by-Step Instructions to Make Vegetable Broth**
1. **Prepare the Vegetables**: Wash and chop the vegetables as described above. There’s no need for precision here, as the broth will be strained at the end.

2. **Combine Ingredients in a Pot**: Place all of the prepared vegetables, garlic, bay leaves, fresh herbs, and peppercorns in a large pot. Add in your filtered water, ensuring the vegetables are fully submerged.
3. **Simmer the Broth**: Bring the mixture to a boil over medium-high heat. Once boiling, reduce the heat to low and let the broth simmer uncovered for 45 minutes to 1 hour. This will allow the flavors to meld together and the vegetables to release their nutrients.
4. **Strain the Broth**: After simmering, use a fine mesh strainer to remove the vegetables and herbs from the liquid. Discard the solids or compost them (you can also save any veggie scraps for future use in composting or making more broth).
5. **Season the Broth**: Taste your homemade vegetable broth and add salt or additional seasoning if needed. If you prefer a stronger flavor, you can simmer it longer to concentrate the flavors.
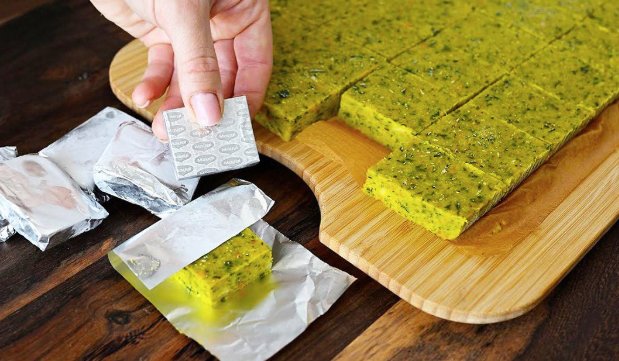
### **How to Freeze Homemade Vegetable Broth into Ice Cubes for Convenience**
One of the best ways to store your homemade vegetable broth is by freezing it into ice cubes. This makes it super easy to grab exactly the right amount for your recipes, and it’s a great way to preserve broth without worrying about it spoiling in the fridge.
Here’s how you can do it:
1. **Cool the Broth**: Let your homemade vegetable broth cool to room temperature. This prevents condensation from forming in the freezer and keeps your broth fresh.
2. **Fill Ice Cube Trays**: Once cooled, pour the broth into ice cube trays, filling each compartment. You can use silicone trays for easier removal, or regular plastic trays will work as well.
3. **Freeze the Broth**: Place the ice cube trays in the freezer and allow them to freeze for several hours or overnight.
4. **Store in Bags**: Once the broth is frozen into cubes, remove the cubes from the trays and transfer them into a **zip-top freezer bag** or **airtight container**. Label the container with the date so you know how long it’s been stored. The broth will keep for up to 3 months in the freezer.
### **How to Use Your Frozen Vegetable Broth Cubes**
Now that you’ve got your broth cubes, here are some ways to use them:
– **For Soups & Stews**: Simply toss one or two broth cubes into your pot as you cook. They’ll melt down quickly and infuse your dish with rich, homemade flavor.
– **As a Base for Sauces**: If you’re making gravies or sauces, use the broth cubes to add depth and flavor.
– **Cooking Grains or Rice**: Replace the water in recipes for rice, quinoa, or couscous with your vegetable broth cubes to enhance the taste.
– **Sautéing Vegetables**: Use the broth cubes in place of oil or butter when sautéing vegetables for a healthier alternative.
### **Benefits of Freezing Vegetable Broth**
– **Convenience**: Frozen broth cubes make it easy to use the exact amount of broth needed for each recipe without any waste.
– **Long Shelf Life**: Freezing ensures your vegetable broth stays fresh for a long time, reducing the need for frequent batch-making.
– **Less Waste**: By freezing the broth in cubes, you can use only what you need, reducing waste and avoiding unnecessary spoilage.
### **Homemade Vegetable Broth for Healthier Meals**
Making your own vegetable broth is a simple, effective way to add rich flavor to your dishes without relying on chemical-laden store-bought alternatives. By freezing your homemade broth into cubes, you make meal prep even easier, ensuring that you always have a healthy, flavorful base on hand for soups, stews, and more.
**Don’t forget to try it out and enjoy the full benefits of a clean, chemical-free broth in your kitchen.** With just a few basic ingredients, you can create a healthy, cost-effective addition to your meals that’s packed with natural flavors and nutrients.
So, say goodbye to store-bought broths and start making your own today